
Wood floors, or the concept of wood flooring in the home is both a practical and aesthetic nod to the postmodern movement. Wood floors deepen the overall decor in the home regardless of style. Owing from its rustic tone, the direct palpability of wooden flooring elicits a cool and peaceful energy in the place.
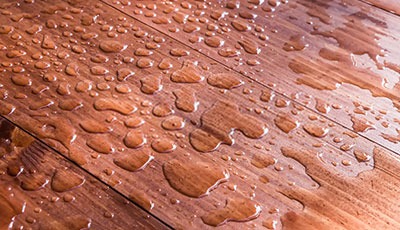
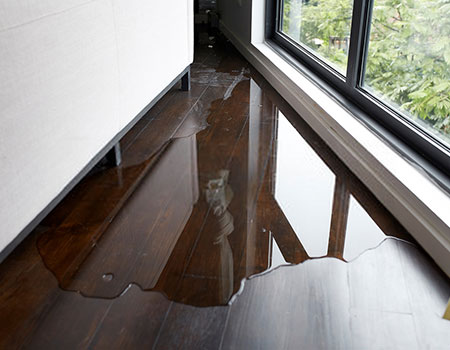
Maintaining a wood floor is too good to be true. This is especially so in the context of water leak. Water leak bears serious damage in its path. Water leak on the wood floor means total replacement. But that should not always be the case here.
If we were to balance probabilities, chances are that we are more likely to save a wood floor from damage than have it replaced. Replacing wood floors takes time, while drying it after water leak effects immediate results.
So why look for impractical alternatives when you can simply dry wood floors after a water leak?
Don’t believe us yet. Watch how we do it in this guide on how to dry out floor after leak.
Wink. Wink.
1. Clear the Wood Floor Area
Clear the entire wood floor area from any moisture-absorbent peripherals– floor mats, carpets, clothings, rugs, etc. These materials, when unmoved, will continue to leak moist into your wood floor, attracting mold and mildew in the long run.
Logically, cleaning and drying the wood floor area with bothersome objects is not only an unpleasant idea, but counterproductive as well. Jars, large figurines, sofa, and the like also impede in your drying process since they all store water underneath. So if you think a water leak has reached their bottom, then have them removed right away.
Once removed, asked assistance from a helper to wipe the furniture dry and air-dry the rugs so you can tend to the wet wood floor.
2. Disinfect the Wood Floor
Clean and disinfect the wood floor as fast as you can. Pour additional clean water (with an amount just enough to cover the dampened part). Use a detergent that does not yield lather.
In cleaning the wood surface, use a scrub that is stiff but not necessarily hard. Abrasive brushes eventually scratch the surface of the wood floor.
Disinfecting the wood floor should be done before drying it, not after. Doing it the other way around means wetting the wood floor again. That would be impractical.
Disinfecting the wood floor should not be missed since it removes all possible mold-causing bacteria from the surface.
Note: Don’t take much time in doing this because the wood floor would require all your immediate attention possible.
3. Dry the Wood Floor Right Away
Depending on the severity of the leaking, you might have to spread over a layer consisting of 3-4 clean rags. At this point, you can now proceed to the procedures on how to soak up water from floor.
Your first aim is to remove visible water from the floor. After soaking the water up using the rags, mop the floor using a professional mop. By doing so, you are fully clearing the floor off of external water and moist.
When all’s clear, focus now on the internal moisture. Use either a water pump or a water vacuum in doing this step. Keep the drying tools running for 15-20 minutes with 2-minute interval shutdowns in between to avoid overheating.
Do not be tempted to stop when you no longer see water on the floor. Inside its pores, water moisture should still be present. Spend another 8-10 minutes on drying.
You’d better be sure!
Please check Top 10 Best Shark Vacuums for Hardwood Floors
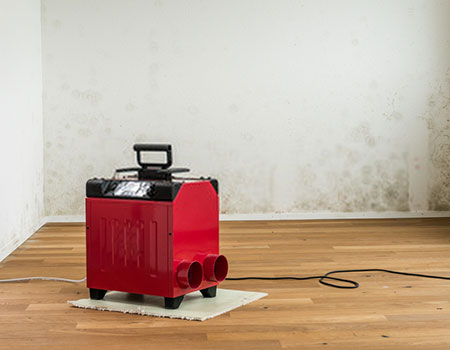
4. De-Humidify Your Room
Humidity in the room is always detrimental to the drying process of the wood floor. To complete the drying process, you are to make sure that moving air is facilitated in your room at the highest possible turnabouts.
Begin by accessing through the floor’s inner planks. If you can, then have these planks opened upward to reveal the subfloors. Finally, you can proceed with the steps on how to dry water under wood floor.
Once done, place a dehumidifier in the middle area of your room where water recently passed. Up the dehumidifier to its highest possible degree. Then place an electric fan in the corner, set in its peak speed, and have its head continuously rotating. Keep this up for the next 24 hours.
Letting outside air in would be wise, but if it is cool rainy air, then do not bother anymore.
Do not be surprised when you still notice visible moisture in the subfloor the next day. Drying processes vary from climate to climate. The best thing that you can do is repeat the dehumidifying process within the day and the next days that follow.
Word of the wise: Patience.
5. Check the Moisture Level Time by Time
Do not rely on the wood floor’s natural capacity to dry. Help it in speeding up its drying process.
Have it in close check for mold and moisture. If possible, have it constantly checked by a moisture testing center. Also, be cautious about possible fluctuations of the meter stick within the coming weeks to a month.

Another trick off the sleeve is by actually drying it whenever it tests low of moisture. Why is this so?
Moisture and the buildup of mold are extremely tricky phenomena. Disinfecting and drying the wood floor, despite the grandiosity of the efforts, do not guarantee to kill 99.9% of the mold/mildew-causing bacteria. The bacteria always finds a way to adapt, scheming its way even to outsmart the meter marks.
A moisture that has successfully bred bacteria always finds a way to shield itself from radar. Whenever a moisture testing meter tests low, it only indicates a rest in activity. Almost immediately, after testing low, the moisture should then suddenly peak up.
The only way to find it if moisture is still kicking under the floorboards is to conduct two tests at extreme phases in the day– the first, during the morning; the second, during the evening. The inconsistencies produced by the test accurately indicate that moisture is still thriving within the floorboards. So, what do you do? Keep on with the dehumidification phase all out until test results stabilize to a continuous low.
No worries. This all should just take an average of 2-3 weeks to complete. Certainly, your patience is stronger than that.
Frequently Asked Questions About Wood Floor Water Leak Damage Control
In which part of the wood floor does the mold usually grow?
Mold grows in the pores of wood floorboards. It usually breeds from underneath the subfloor going up.
How important is the dehumidification process?
Dehumidification process is extremely important as it seals the fate of your wood floor; it speeds up the drying process and controls the humidity in the area.
Is mold and mildew dangerous to health?
Yes. They are a serious threat to health; they cause or trigger allergies, lung problems, skin irritations, eye irritation, nasal problems, and many more. Read to learn more about mold exposure.
Conclusion
Wood floor/wood flooring is indeed a great addition in the home. It spells character, texture, and depth in the home decor. As it turned out, wood floors tend to be a sustainable material even in the context of water leak.
Replacing wood floors, just because of water leak, tends to be a costly and timely venture. Albeit drying the wood floor after water leak demands time and effort, it is more so in the case of replacing them with new ones.
In the end, we will neither say easy or difficult. By all means, drying the wood floor after a water leak is a relative experience. But the two true driving forces for successfully realizing this are consistency and patience.