Learning the steps on how to clean rubber floor mats ensures their cleanliness and durability.
Rubber floor mats play a crucial role in protecting your main floor from dust, dirt and other pollutants. It collects and absorbs most of the dust particles, causing them to settle on the exterior surface.
With that being said, rubber floor mats tend to become one of the dirtiest parts of any space. It’s also one of the most challenging materials to maintain, owing to the fact that it’s constantly in contact with damaging agents – sharp objects, odor, adhesives, etc.
Good for you – we’ve got here in this article the simplest, yet most effective rubber floor mat cleaning procedures.
All you have to do is read this article to the end.
What are you waiting for? Let’s bend our bodies like rubber and start cleaning…
Table of Contents
5 QUICK & EFFECTIVE STEPS ON HOW TO CLEAN RUBBER FLOOR MATS
Rubber floor mats aren’t just in there for the decor. They work to keep the dust, debris and other pollutants settled on the floor, keeping them from flying all over the place. In addition, rubber mats are longer-lasting than most types of mats.
Therefore, if there’s one floor type that needs a more frequent cleaning and protection, that would be the rubber floor mat.
Here’s how to clean rubber floor mats…
STEP #1. FORMULATE YOUR OWN DISINFECTANT.
Disinfecting the floor mat comes off as a priority before doing the main steps on how to clean rubber floor mats. While you can simply buy a rubber mat disinfectant, it would be best to prepare your own natural homemade solution. Here’s how to do it:
- Prepare a large bucket.
- In a large bucket, pour in a gallon of balmy water.
- Mix well.
- Add natural aromatic ingredients like citrus juice, citronella, and other natural fragrances.
- Add in 3-4 drops of mild detergent to thicken the solution.
STEP #2. MOP THE FLOOR.
Now, we’ve come to the main part of the cleaning procedure. And, all it involves is a sponge mop. Why a sponge mop? Because, a sponge mop holds and disperses water more effectively necessary for dealing with rubber floor mat surface gaps. Here’s how to do it:
- Check the mop of any pointed or sharp edges before using to avoid scraping the surface.
- Plunge the sponge mop into your disinfectant solution.
- Let it absorb as much water as possible.
- Lay the mop on the rubber flooring. Preferably, begin on one side, and then move across to the opposite side. Maintain a one-way path to avoid re-contaminating the area.
- Do not dip the mop back into the solution until it’s fully dried up.
STEP #3. FOCUS ON AREA STAINS; BRUSH IF YOU MUST.
Mopping a rubber mat, under favorable circumstances, usually no longer entails anything else. That’s just about it. And you can freely go on your way. However, things get serious when ingrained stains are involved. Here’s how to deal with it:
- After mopping the entire rubber mat, allow the solution to settle.
- Once done, check out for remaining stains.
- If you notice ingrained stains, do not re-mop. Instead, apply a stronger ready-made cleaning solution to the marked area.
- Once done, clean the area with a hand brush.
- Remember to brush lightly to keep the bristles from scraping the rubber surface.
STEP #4. FOCUS ON DIFFICULT STAINS.
Have you tried all your might to follow the steps above, but still ending up with the frustrating stains? Don’t panic. These stains, known as ‘acidic imprints’, have seeped into the main layer of the rubber mats. So, removing them requires an extra concentration on the solution. Read on to learn how to do it:
- Apply a generous amount of toothpaste (white) into the affected area.
- Spread the toothpaste using a sponge.
- Let the paste soak for at least 10 minutes.
- Pour balmy water into the paste.
- Wipe the treated area with clean, dry hand cloth.
- Continue wiping until the stain is removed.
- Repeat the whole process if necessary.
STEP #5. POLISH FLOOR.
This ‘finishing touch’ for the main cleaning process determines the rubber floor mat’s overall longevity, cleanliness, and luster. To make it clear, once and for all, this step is not optional; this had to be observed every after the main cleaning procedure. Here’s how to easily do it:
- Pour 1 cup of rubber mat conditioner into ½ gallon of balmy water.
- Mix well.
- Pour the solution into the floor.
- Mop again but this time, only tpo absorb excess water.
- Let the solution sit in for 10 minutes.
- Buff/polish the entire mat with a buffing machine.
- Clear moisture with another clean and dry cloth.
- Repeat this process on a daily basis within 1 week.
- After 1 week, repeat the entire cleaning procedure.
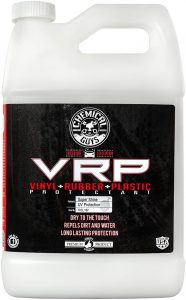
Note: In place of a conditioner, you can better the results by using Chemical Guys VRP. The VRP in this package stands for vinyl, rubber, and plastic. So, it should be safe on rubber floor mats.
Standout features of the product include a non-greasy quality, refined cream texture (best for polishing rough surfaces), mess-free application, and a lot more. You can take our word for it: it will polish your rubber floor mat with 100% accuracy!
Important thing to remember when using this product: Always apply generous amounts of it.
>>Check the product here.<<
And, that’s about it: the steps on how to clean rubber floor mats. Easy, ain’t it?
Now, check out below the important points to consider in ensuring the success of the cleaning procedures…
MATERIALS TO AVOID WHEN CLEANING RUBBER FLOOR MATS
Rubber floor mats are sensitive to a lot of factors. But, it is most sensitive with highly-acidic products.
If you’re aiming for a perfectly-cleaned and conditioned rubber floor mat, do avoid the following materials…
- Solvent chemicals
- Highly-acidic solutions
- WD-40
- Muriatic acid
- Acetone-based solutions
- Paint thinners
- Pine Sol
- And many more
Now that you’ve avoided these harmful agents, reward yourself with some important and useful points…
POINTS TO REMEMBER WHEN CLEANING RUBBER FLOOR MATS
Here are some points to remember when cleaning rubber floor mats…
- Note that wooden or plywood interior floors (underneath the rubber mat) can cause water to seep into its gaps, causing molds to form in the future. The rubber mat on top should make it difficult to spot the mold. To prevent this from happening, layer a damp-proof membrane in between the rubber mat and the wooden floor underneath.
- If you’re concerned about your rubber floor mat absorbing excessive pollutants and eventually losing its luster for good, then do this useful tip. Sweep the dust off the mat at least an hour before buffing it. This should prevent the dust particles from ingraining into the rubber surface. Do this on a regular basis.
- Avoid placing extremely heavy objects on top of the rubber floor mat as it creases its surface, affecting its dust-holding abilities in the long run.
2 BEST RUBBER FLOOR MAT MOPS IN 2023
The quality of the rubber floor mat mop highly determines the success of the effort. Thus, it is only essential to choose the right mop for your rubber floor mat.
Fortunately, we’ve had our 2 best mops reviewed for you in 2023!
Check them all out…
- Turbo Microfiber Mop Floor Cleaning System. What’s most notable about this product is that it’s a system. It comes with an all-complete cleaning parts – strong metal head, scrubbing pads, 360-degree spin head, etc.
This extensive micro-fiber mop not only fits rubber mats most, but also other areas in the home like an office, laundry room, living room, basement, etc. In addition, it’s easily carried around due to its overall light handle, aluminum material, and some additional plastic links.
This product is also machine-washable so that dipping it into solutions for long hours does not spell a problem. Also, you can quickly re-use it after washing since it’s a quick-dry material.
Ultimately, what I find most interesting about this microfiber mop is its ability to hold and disperse water. It should be perfect for cleaning rubber floor mats.
Pros:
- Premium Microfiber quality
- Lightweight and durable
- Machine-washable
- Quick-dry quality
- All-complete cleaning parts
- Adjustable handle
Cons
- Weak velcro strips
- Head takes time to be adjus
- Poly Mop PVA Sponge Mop Bucket. One of the most promising mops in 2023, this one reigns as special by the fact that it includes a bucket in its package. But wait, there’s more.
The Poly Mop 3 PVAs allow 3 actions per strike- wash, rinse, and dry. This exactly
what makes the product a super-favorite.
What I find most pleasing about this mop is its high-absorption capacity. It also covers most of the surface of the floor without needing much effort.
Pros:
- Lightweight
- 3-in-1 function
- Includes 1 bucket in its package.
- Durable
- Extended handle
- Cleans rubber floor mats perfectly
Cons:
- Bucket has limited size
- Limiting wringing extent
- Loose clips
- Difficult to assemble
So there goes the 2 awesome mops you can choose from in cleaning your rubber floor mats…
Read on for our 2 best cleaning solutions…
CONCLUSION
Just because rubber floor mats are a known resilient material does not mean that you shouldn’t reward it with the steps on how to clean rubber floor mats.
Of all floor types, rubber floor mats tend to hold more dirt and pollutants. That only means one thing: it ends up being the dirtiest material in your place at the end of the day.
Cleaning and maintaining rubber floor mats is a basic priority. If you want to prolong it, then you’ll have to protect it from possible damage. Cleaning it means prolonging its quality.
In the end, no one benefits a cleaner rubber floor mat more than yourself.

