
Table of Contents
Need to know about rubber gym floor cleaning solutions?
One of the perks of having rubber floor tiles in your gym includes a durable flooring material. Rubber floor tiles perfectly fit environments like a gym wherein damaging factors like stain, moist, and breakage are inevitable.
But rubber floor tiles are quite handy! Unfortunately, while they’re easy to maintain and beneficial from one side of the coin, they are hard to clean on the other side. It’s more of a 50/50 scenario.
Luckily, we’re sharing with you here in this article our effective cleaning solutions.
Read this article to the end to master the solutions and gain the following:
- A cleaner, drier rubber gym floor
- An odor-free rubber gym floor
- Additional knowledge on how to maintain rubber gym floor
- A damage-free rubber floor
- A shinier rubber floor
- And many more…
Pick up your cleaning tools and let’s proceed!
THE ULTIMATE RUBBER GYM FLOOR CLEANING SOLUTIONS IN 2023
Like most floor types, the rubber floor has special needs when it comes to cleaning. And, nothing does it better than our effective and easy rubber gym floor cleaning solutions!
The solutions are as follows…
STEP #1. PREPARE THE APPROPRIATE CLEANING MATERIALS AND TOOLS.
Basic cleaning materials include:
- White vinegar: 1 cup (240 mL)
- Hot water: 1 gallon (3.8 L)
- Mild dish soap
- Natural fragrance solutions
Basic cleaning tools and peripherals include
- Floor/carpet brush vacuum cleaner
- Sponge roller or mop
- Hand brush (optional)
- Standing fan (optional)
- Extra-Sized pail/bucket
- Wood/plastic scraper
STEP #2. VACUUM DUST AND DIRT OFF THE FLOOR USING CARPET BRUSH VACUUM.
- Make sure that the vacuum you’re using has soft bristles (obtainable only from a brush vacuum) and an encased roller to avoid snags and wounds on the rubber surface.
- Sweep the floor and store dust to a pan before vacuuming.
- Roll the vacuum across the entire surface of the floor to clear it from dust, dirt, debris, etc.
STEP #3. LOOSEN STICKY STUFF OFF THE FLOOR.
Sticky stuff like bubble gums, glue, tapes and other adhesives are common on a rubber gym floor. So, here’s how to best deal with it…
Remember: This step is not optional so that it should be observed before proceeding to the next step.
- Slowly land the edge of the scraper on the top-side of the stuck object.
- Bury the scraper further under the object until it comes into contact with the surface.
- Push the object upwards to loosen it. If the object is tightly stuck, don’t force it out as it can tear the rubber surface.
- Wet the stuck object by sprinkling it with water.
- Loosen the stuck object until almost removed.
- Vacuum the area to clean.
Note: When scraping, don’t apply excessive force on the edge of the scraper as it can potentially abrade the rubber’s outer layer.
STEP #4. PREPARE MILD RUBBER FLOOR CLEANING MIX.
- Mix 1 cup of white vinegar with a gallon of hot water in a pail.
- Add in natural fragrances like lemon or essential oils.
- Add in the mixture 4-5 drops of mild dish soap.
STEP #5. POUR THE MIX AND LAY IT OUT TOWARDS THE FLOOR USING A MOP.
- Thoroughly submerge the sponge roller or mop into the mix.
- Lay the mop on the floor and begin mopping.
- Mop on a backward position so that you don’t have to go back and unnecessarily step on the already-mopped part of the floor.
- Take your time when necessary. Focus on obstinate dirts, stains, etc.
- If dirt persists, set the mop/sponge roller aside and treat it with a hand brush. Just remember to not apply too much pressure on it.
- Continue mopping. Pause every once in a while to check on your mix. If the it changes in color and becomes darker, pour it out and replace with a new solution.
Caution: Some mops, even roller pads, are designed with a sharp frame that potentially damages the rubber floor. So, choose the untextured design.
STEP #6. LEAVE THE RUBBER GYM FLOOR TO DRY.
- Avoid walking on the floor after mopping.
- Open windows and doors to allow ventilation. Use a standing fan if necessary.
- Repeat the whole cleaning process on a daily or weekly basis.
So there you go: our 6 important gym floor cleaning solutions in 2023!
Let’s move on to learn rubber gym floor polishing hacks…
Do you know The Rubber Cal Elephant Bark Floor Mat Is So High On Demand !
RUBBER GYM FLOOR POLISHING HACKS:
It always feels rewarding to go the extra mile when cleaning rubber gym floors. Who doesn’t want to work-out in a gym with polished floors?
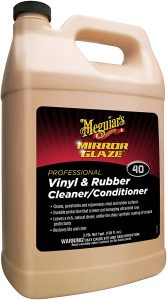
The key to achieving it: a rubber floor conditioner (check out our favorite rubber floor conditioner here)
Here’s how to do it:
1. Prepare the polishing/buffing materials.
2. Apply the solution on the rough area of the rubber floor surface.
3. Wipe the surface with a cloth or a buffing machine.
4. Allow the solution to absorb for 10 minutes.
5. Wipe the surface again with a dry cloth.
Note: Do this method after the main cleaning method. Also, maintain this on a daily basis until the surface becomes shiny.
So that’s about it. That’s our ultimate rubber gym floor cleaning solution in 2023, including the polishing hacks.
Continue reading to hear our conclusion.
Conclusion
Needless to say, rubber gym floors are busy floors. They’ve got special needs only the rubber gym floor cleaning solutions can provide. Simply said, they’re not easy to maintain.
If observed, the solutions are sure to increase positive maintenance results by 40%. Moreso, it promises to reduce effort and time by 30%.
All-in-all, they’re all effective and easy to do.
Here are the solutions in quick review:
- Prepare the appropriate cleaning materials and tools.
- Vacuum dust and dirt off the floor.
- Loosen sticky stuff off the floor.
- Prepare mild rubber floor cleaning solution.
- Pour the solution and lay it out towards the floor using a mop.
- Leave the rubber gym floor to dry.
And, for an extra-shine, don’t forget to learn the polishing hacks. They only take 15-20 minutes to finish.
Best of luck!